Users Settings Help
The user settings page gives the admin user the options to add and remove users. Specific user details can also be edited from this page.
There are two types of user:
-
User: This is the standard user type and only has access to the standard application functionality. All access to the settings features is disabled for Users. By default, this will be the type of user created unless the admin check box is selected on creation. Unless administration settings are required users should be of this type.
-
Admin User: This is the administrator user for the application. An admin user has access to all available settings for the application.
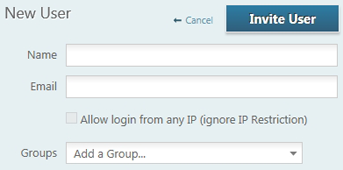
Invite new user: Click Invite a new user, the user information input appears on the right of the screen. Enter a user name, the user email address, whether the user can ignore IP restrictions, and which groups you want them to belong. If the user being created is an Admin User, you need to add them to the Administrator group using the Groups drop-down menu. If they are not added to this group then a normal User will be created. To finish the process, click Invite User. When you invite a new user, your organization may incur additional charges for the new user if the number of active users exceeds the contracted number of users. To authorize the charges click Yes.
NOTE: Not all details must be entered to create a user. Only the Name, Email and password fields are mandatory however it is recommended that all fields are entered.
Import users from CSV file: If you require adding a large amount of users then you can create multiple users using a CSV file. Click import users. Click Browse to locate the CSV file that contains the user details. Click Submit to import the users. The additional charges confirmation dialog will appear. To accept these conditions click Yes.
NOTE: The CSV file structure must be as follows
-
File format: csv (comma separated values)
-
First row: column headings (options are *name, *email, admin, phone, mobile, address, address2, city, country, state, zip, password; * = required)
-
Other rows: users to import.
-
Default values: country and state information will default to what was provided in general settings if they are left empty.
-
Note: please provide a country if you provide a state, otherwise state information will not be saved.
Edit user details:
Click on the users name or the
 , the user details will appear on the right of the screen. You can edit any of the user details available here then click Save. Users are responsible for updating the rest of their details and their password through their HotDocs Market account.
Exempt from IP Restriction: To exempt a user from the IP Restriction feature (i.e. for a travelling user) select the
 check box.
Manage groups:
To view the groups page click on manage groups. Click on next to the group names to edit, assign users or groups or click on
 to delete a group. When editing a group you have the option to set up Default Permissions. To create a new group, click on add a new group, the group information will appear on the right-hand side of the screen. Fill in the name and description, then select users or existing groups you would like to add to the new group. Click Create Group. To return to the Users page click manage users.